Your shipments should automatically flow to Quiqup and your Quiqdash if you have integrated your e-commerce platform. However, you also have options to place orders directly on the Quiqdash platform.
TABLE OF CONTENTS
Single Order
Click on the +Create Single Order button

Delivery order
Choose order type: Delivery.
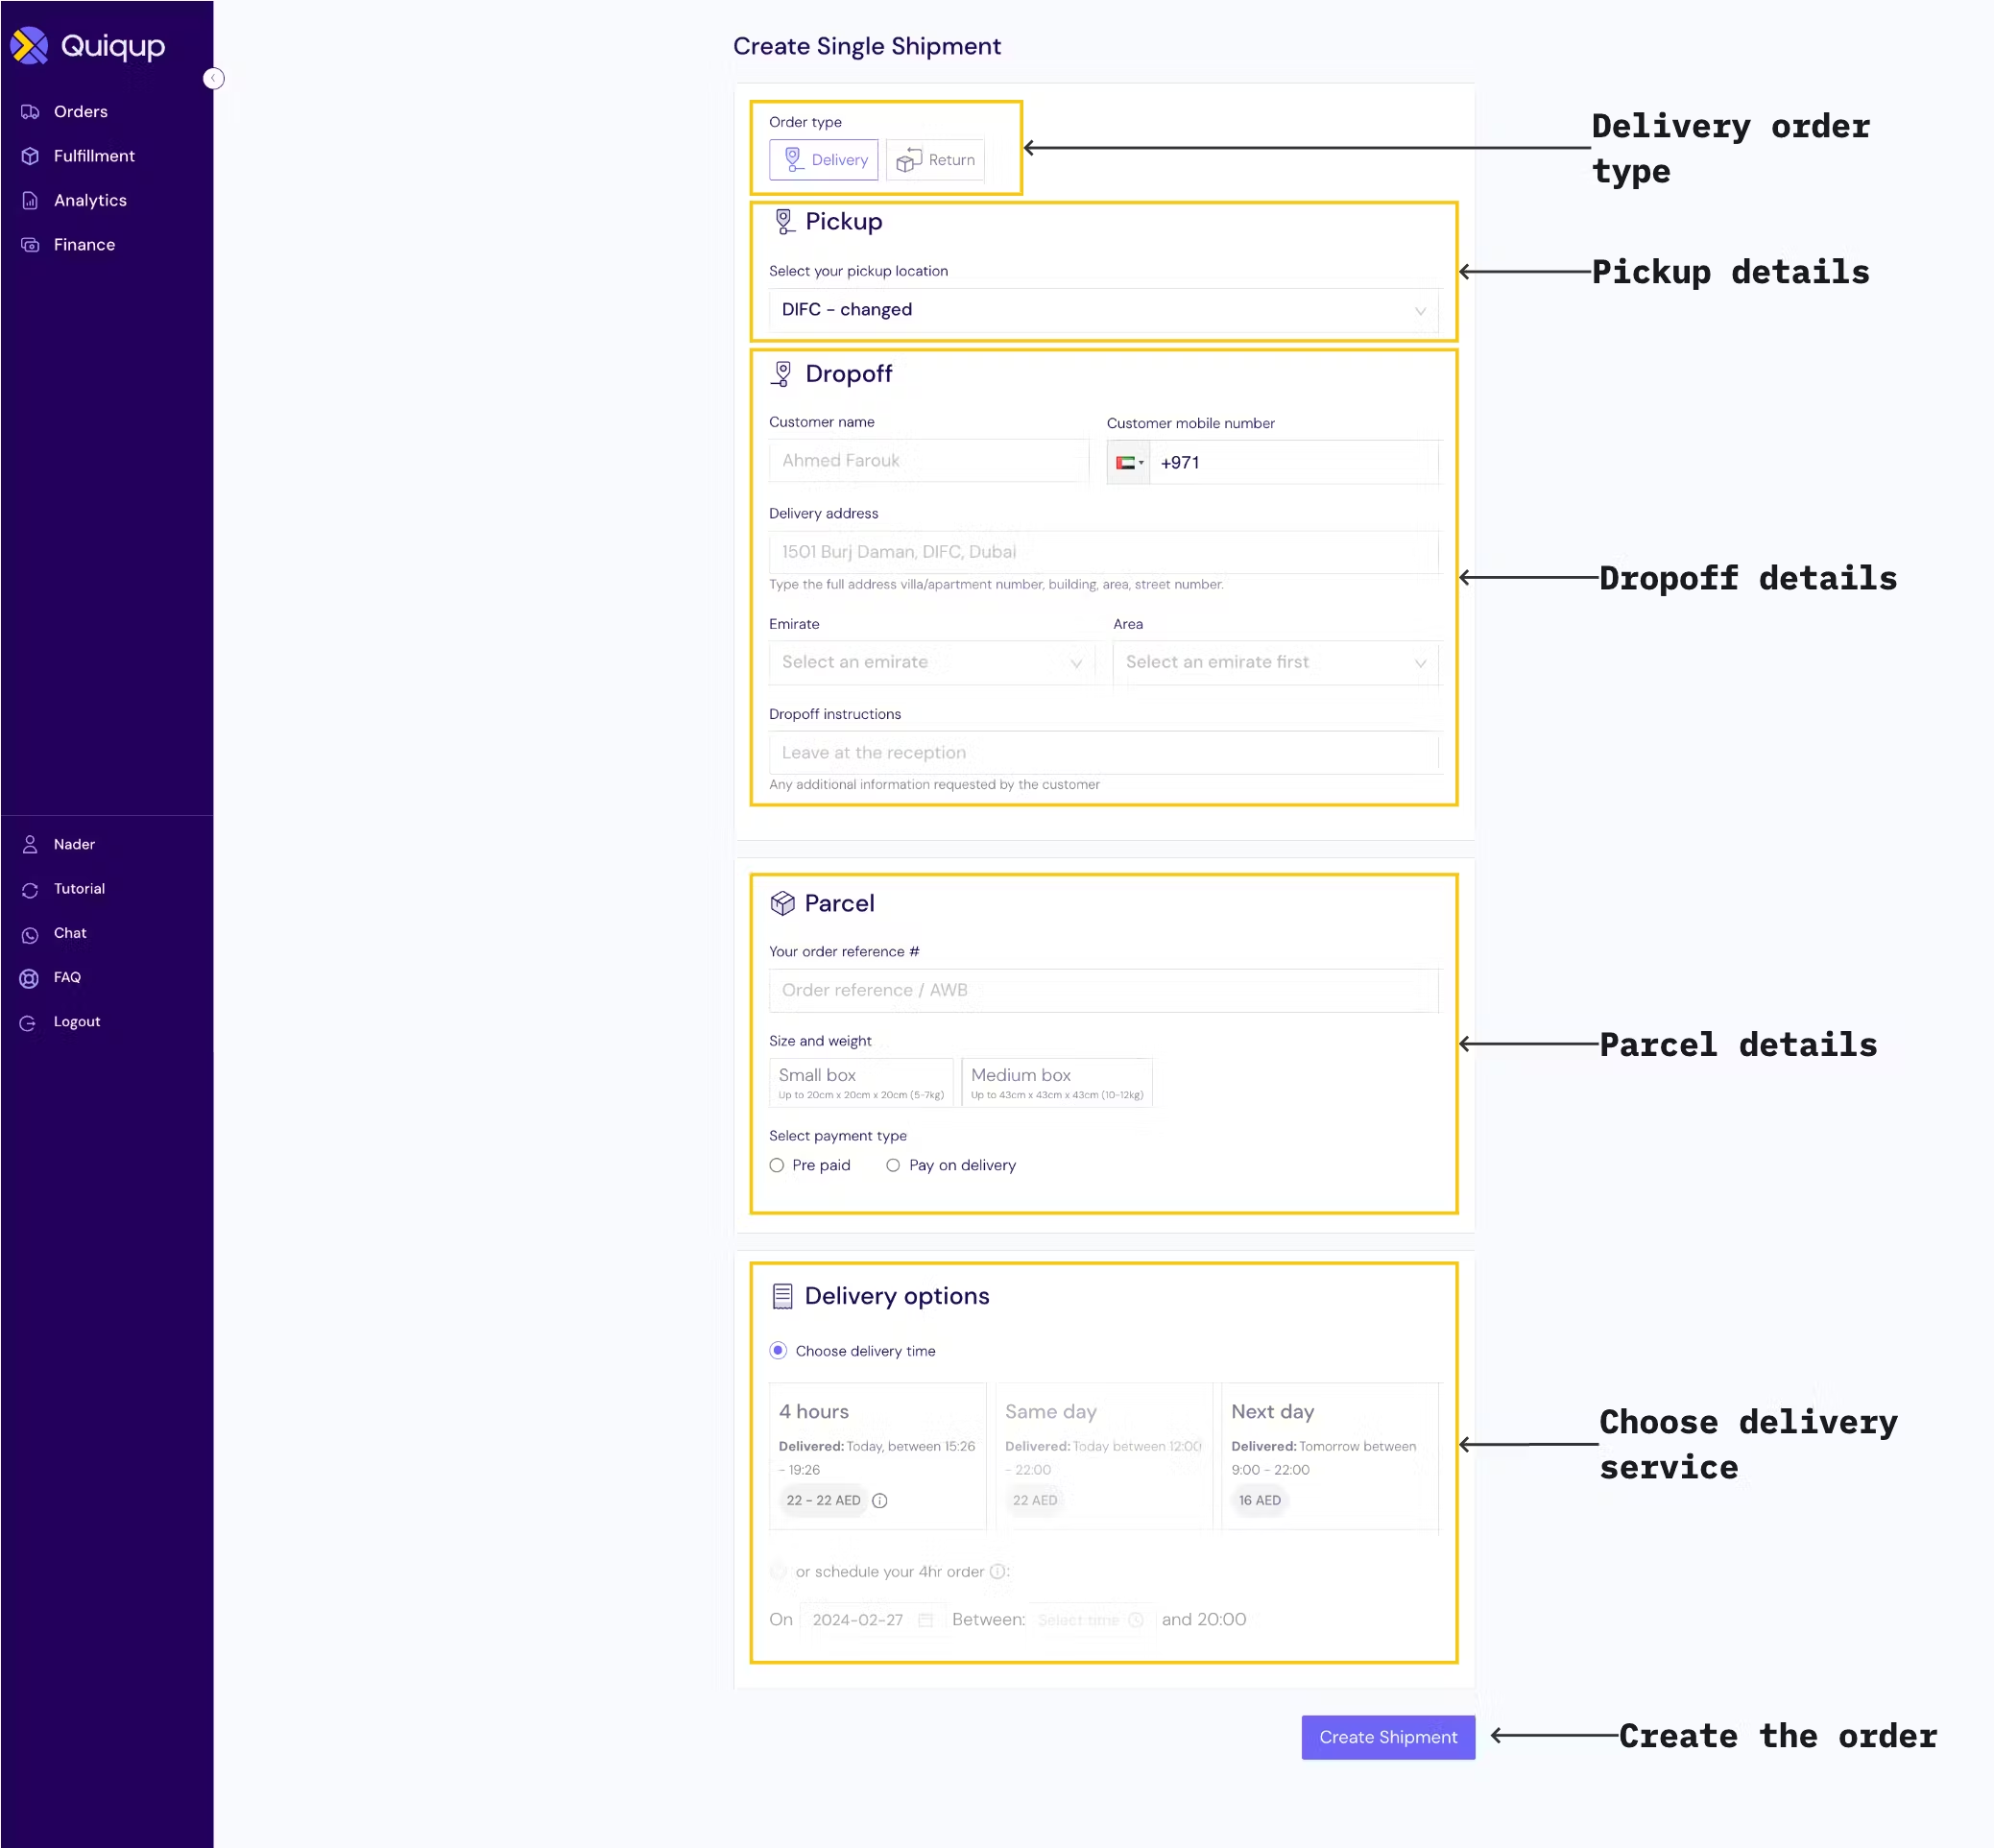
When you click on "Create Single Order” you will see a form where we ask you to provide all the necessary details for us to create a shipment. Here is an overview of the information that is required:
- Order type: Delivery
- Pickup details: This information may come from Salesforce if it has been configured, or if you are using self-signup, there may be additional fields that need to be filled out.
- Dropoff details: These are the details we need to successfully deliver the order to the intended recipient.
- Parcel details: This includes information about what we will be collecting and delivering.
- Choose the delivery service: Select the desired delivery service from the options provided.
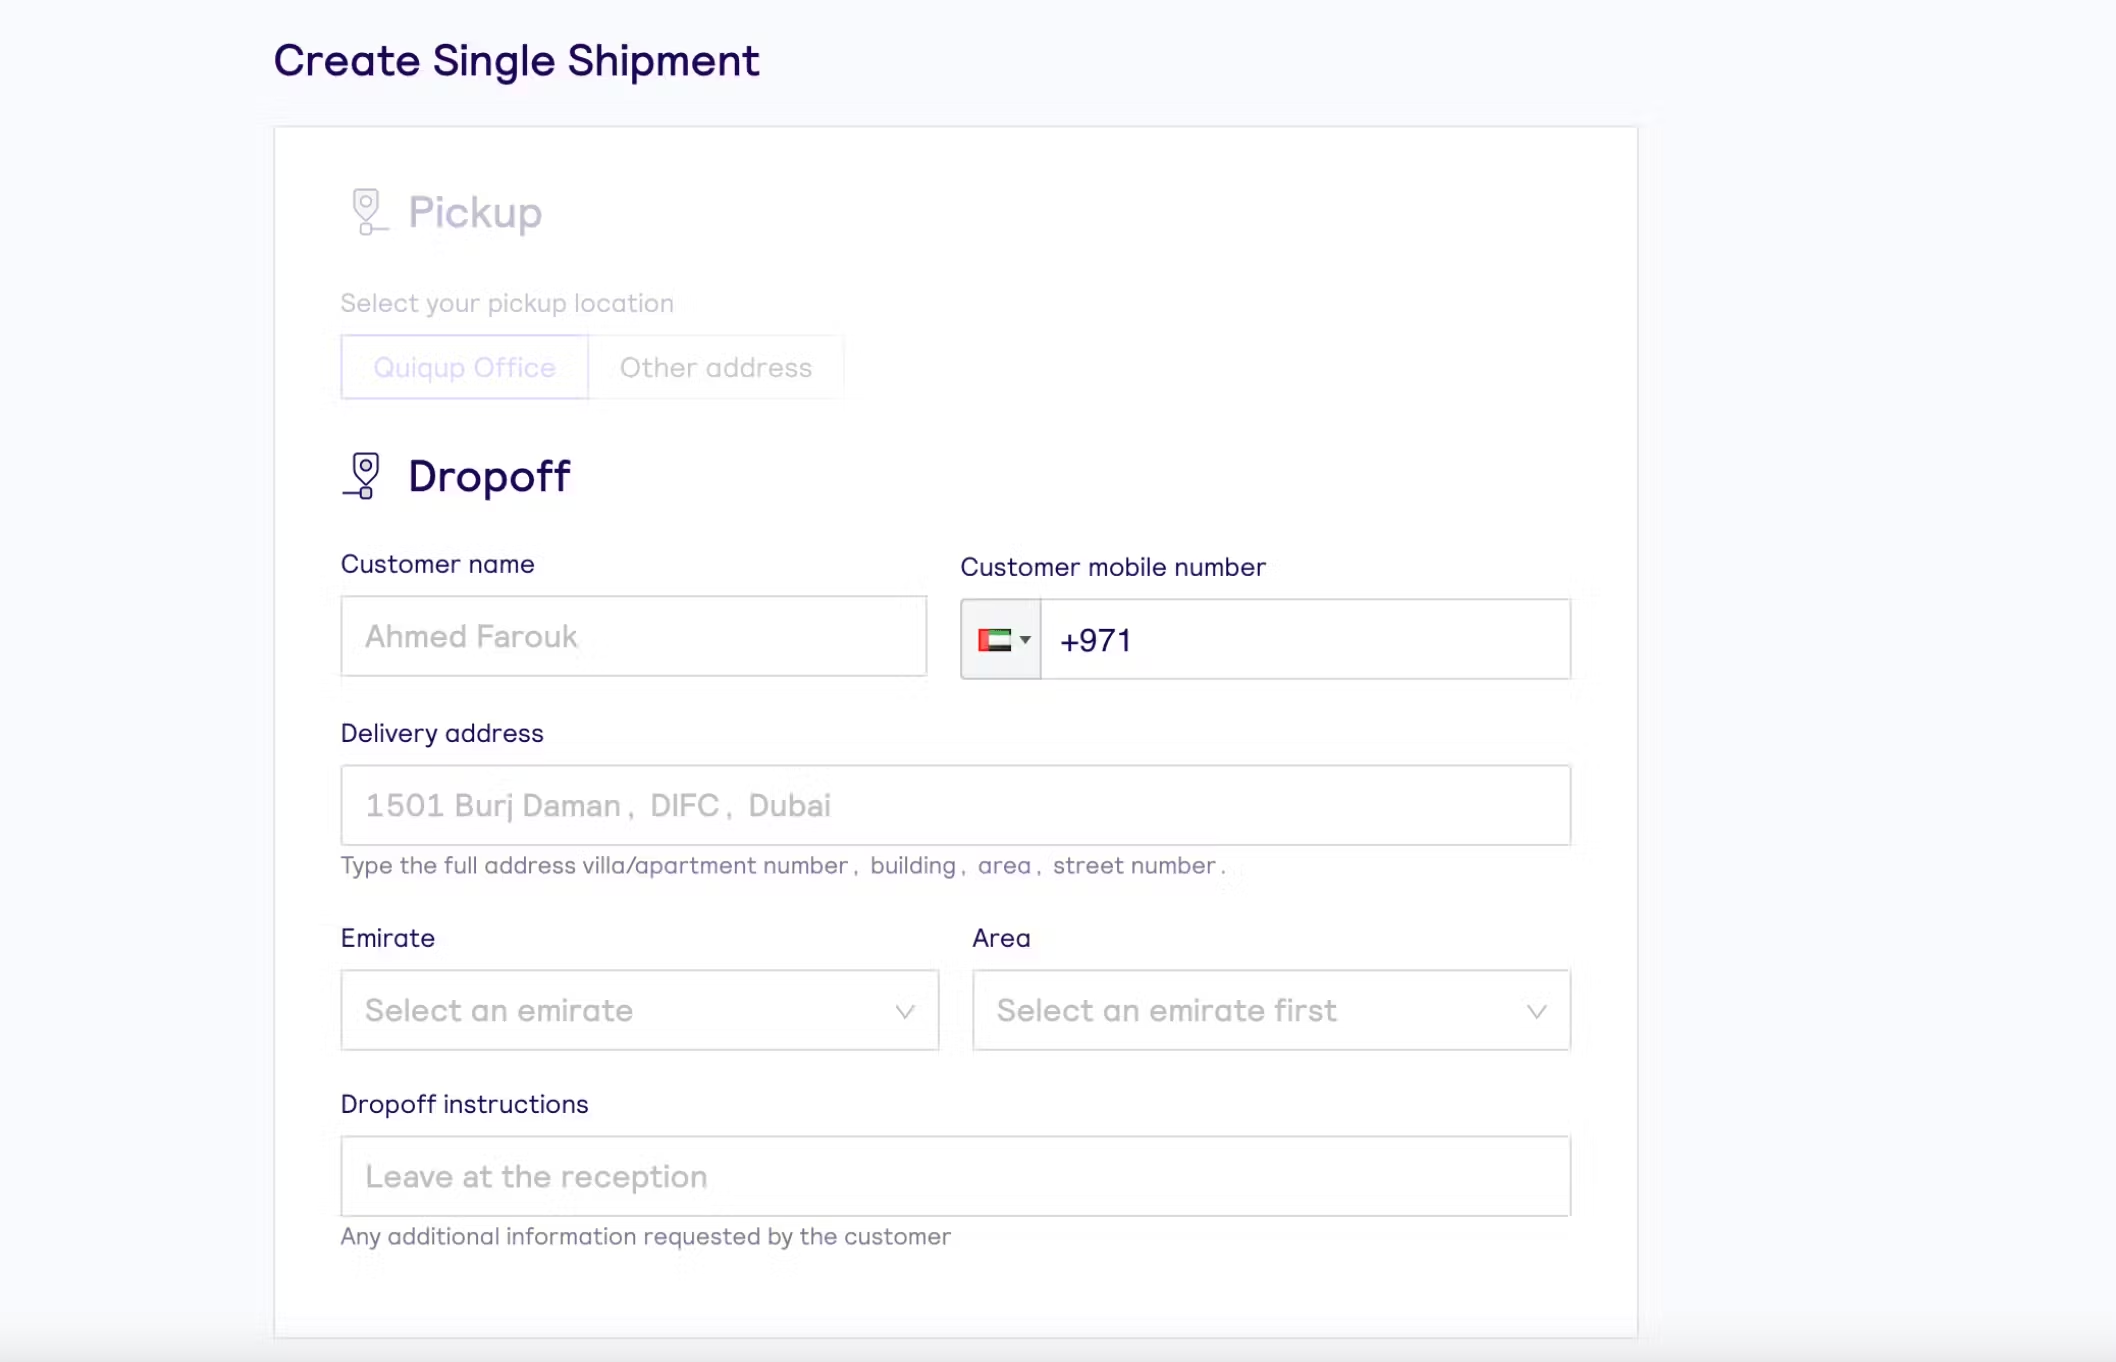
1) Fill up the pickup details
In the Pick up block you can either choose your standard location or select "Other address" and fill in the information for a one-time collection.

2) Fill up the dropoff details
In the Dropoff block you need to fill in all the recipient information.
3) Fill up the parcel details
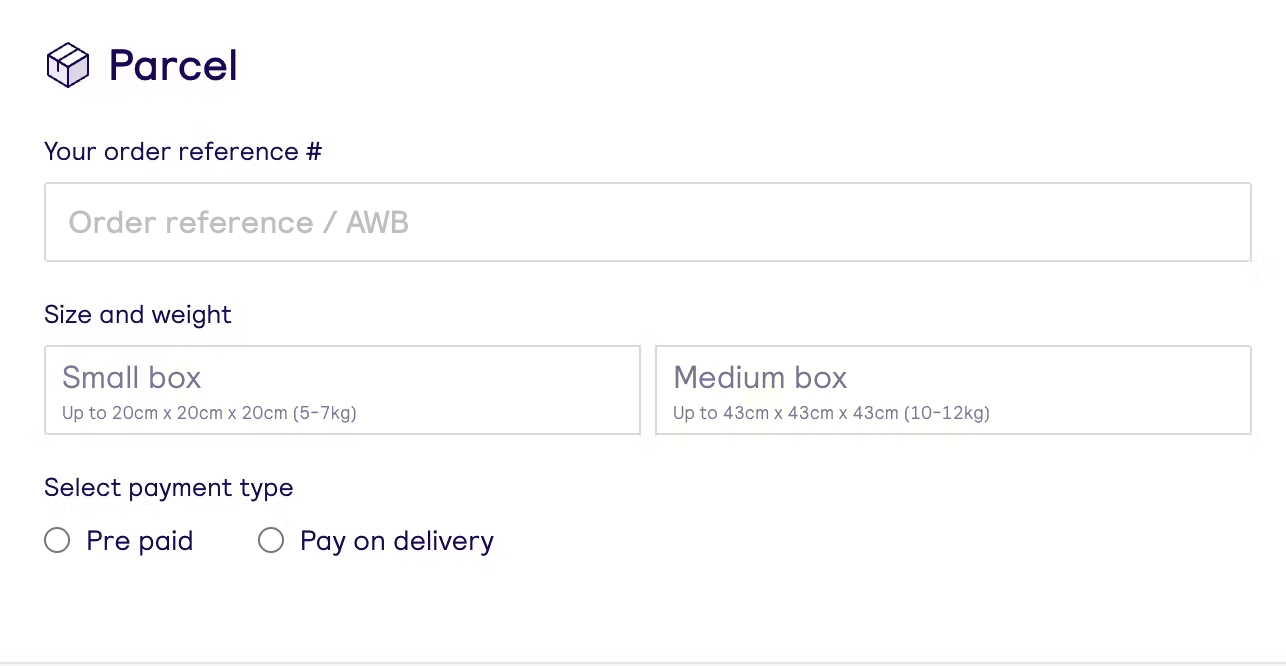
- Your order reference - here you can either type in your order ID or any random number
- Size and Weight - choose package size depending on the weight and size of your package
- Select payment type:
- Prepaid - select this option if the customer has already paid through the website or via other way of transfer
- Pay on delivery - select this option if Quiqup courier has to collect the payment from the customer. You will need to specify the total amount that the courier will have to charge your customer (order amount + delivery charge)
4) Choose the delivery option
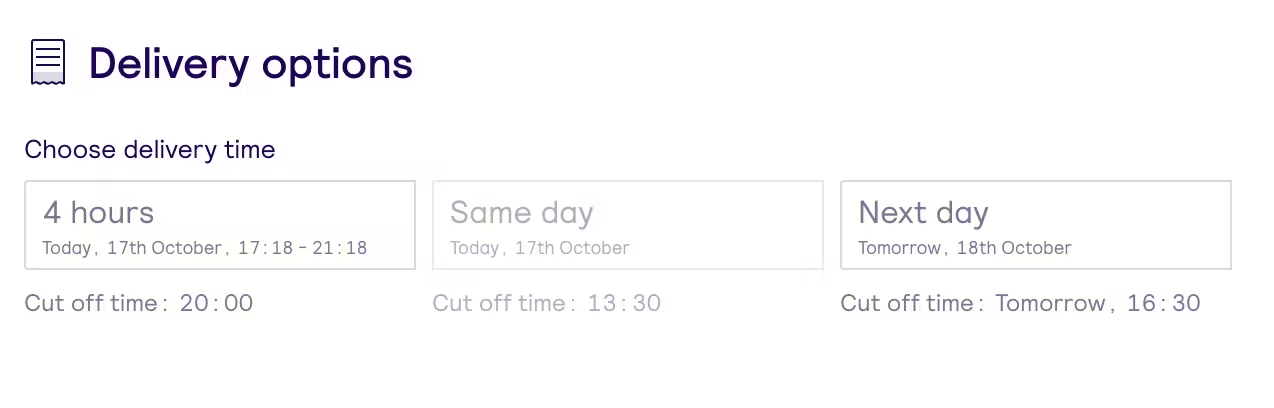
Choose the respective delivery option:
- 4-Hours
- Same Day
- Next Day
*If the delivery option does not apply to the dropoff area or it is past the cut off time, then the delivery option will be disabled
5) Create shipment
Click on the create button to place your order.

Return order
Returns can be initiated either through Quiqdash or automated if you use Shopify by purchasing Returns Prime.
Login to your Quiqdash account, select an order that was previously delivered and select Return.

Or create a new Single Order.
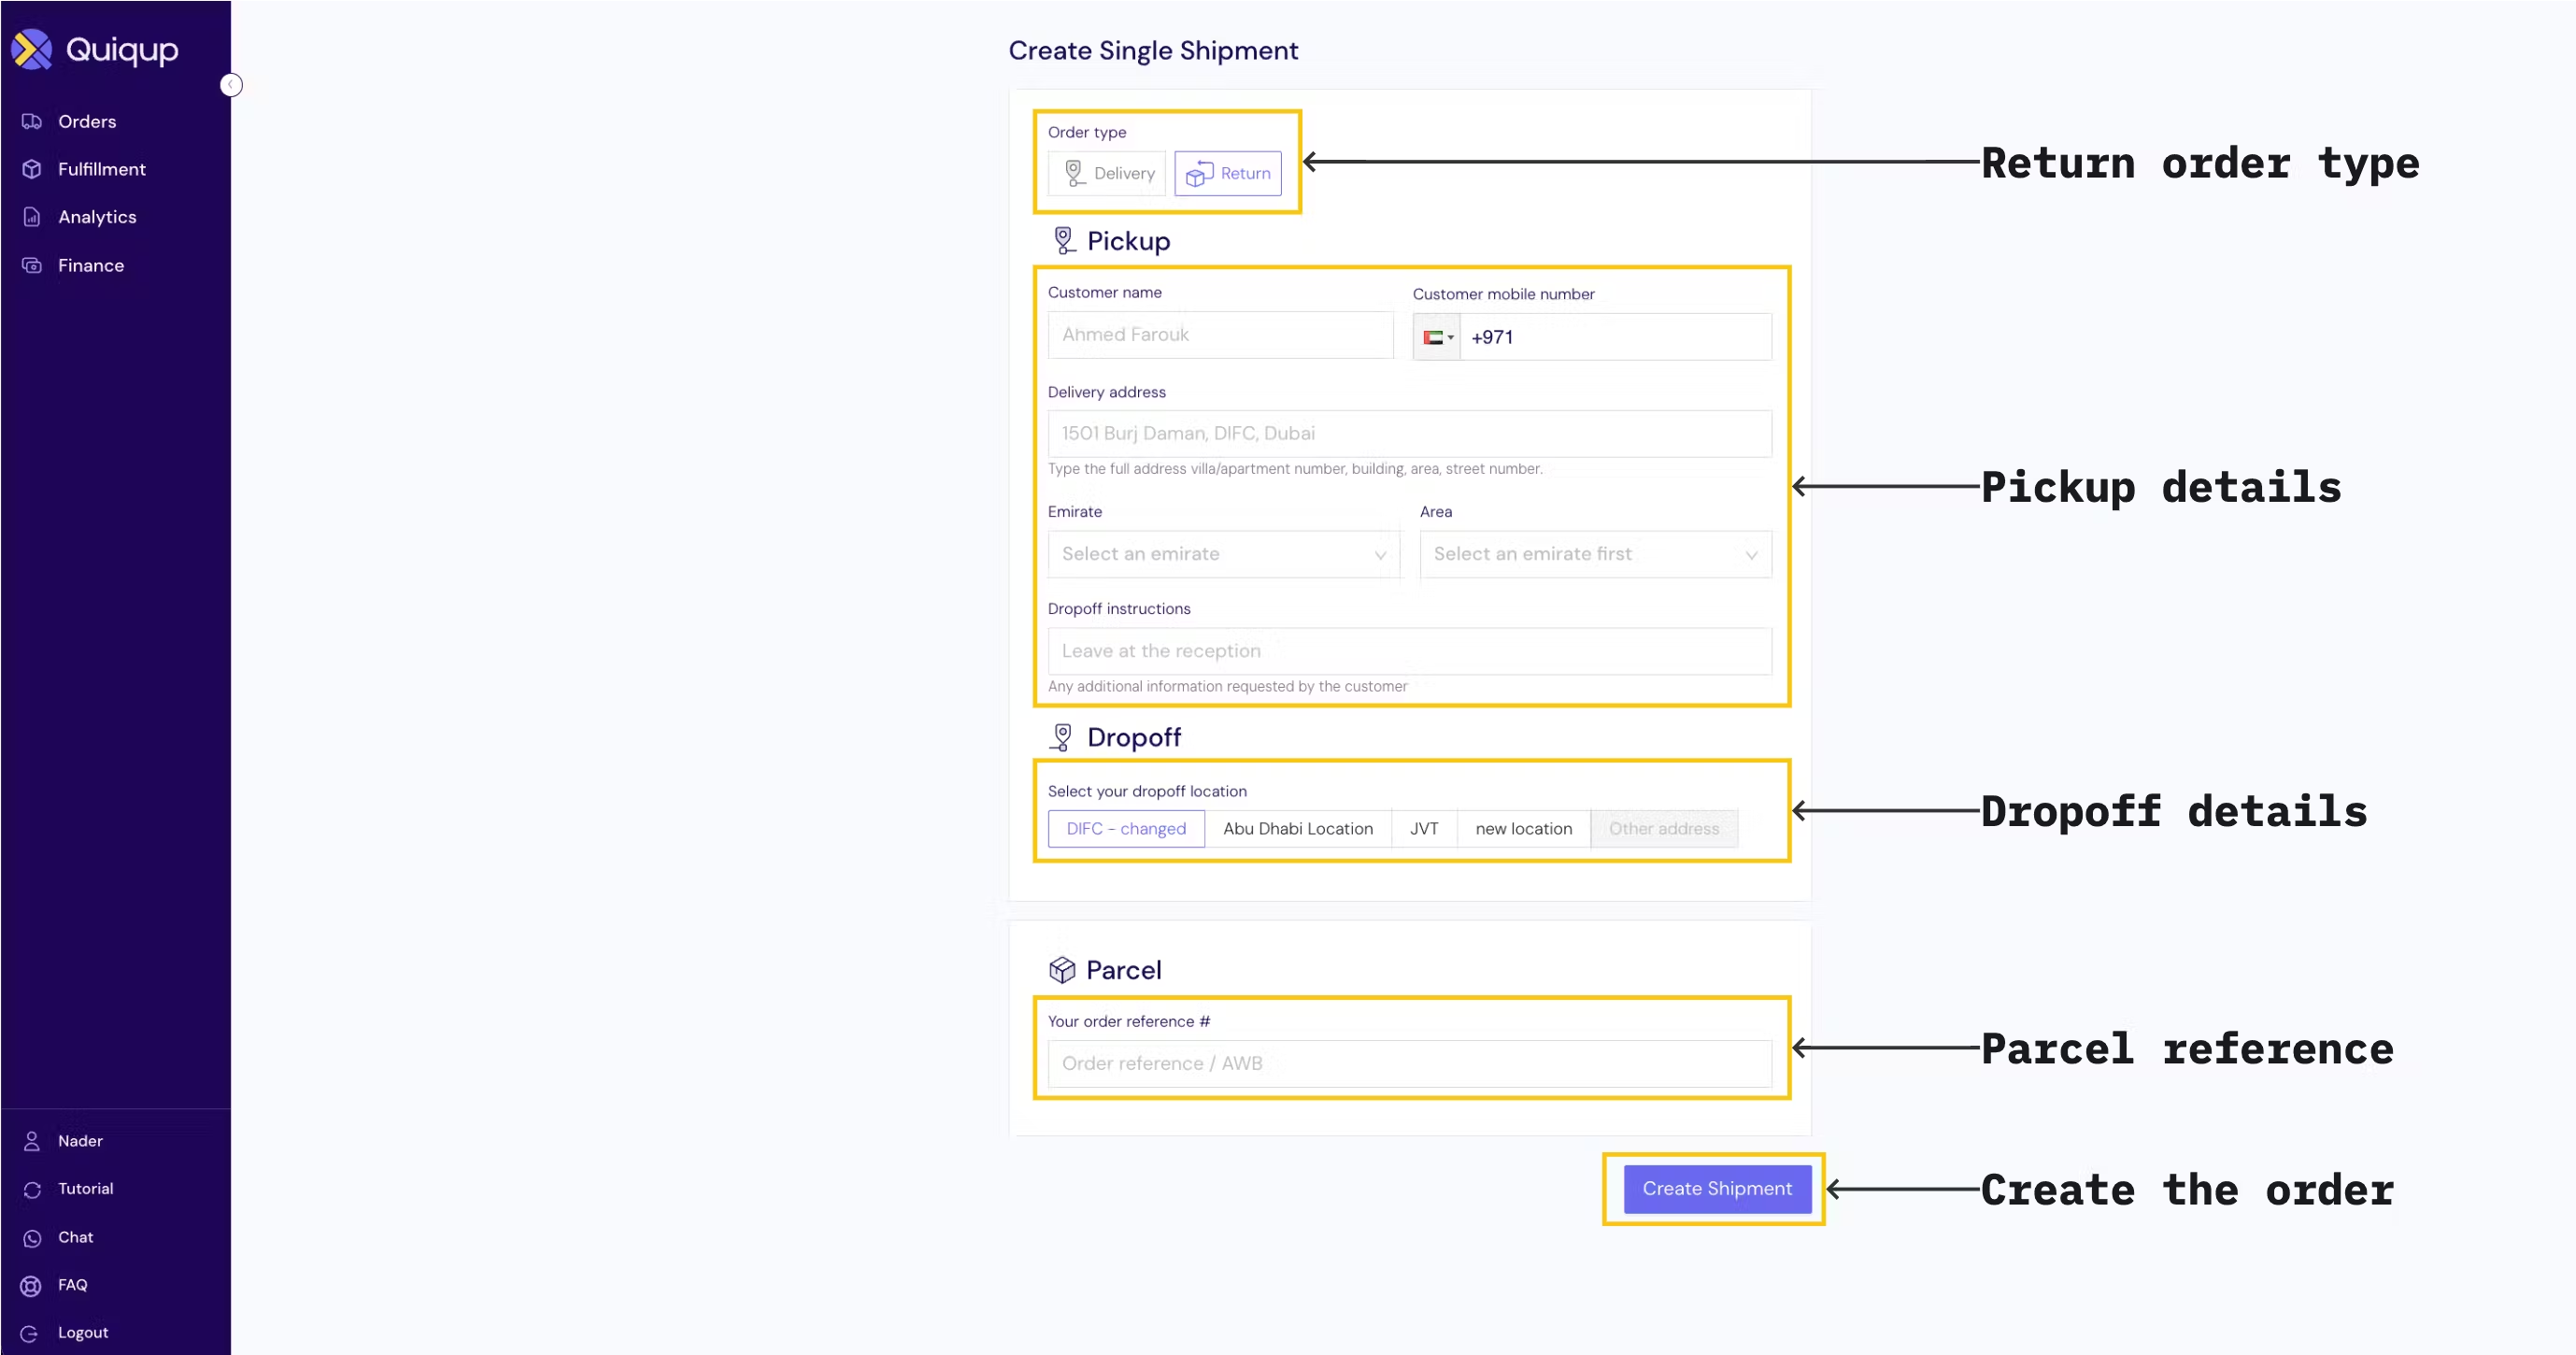
When the users clicks on "Create Single Order” they will see a form where they are asked to provide all the necessary details for us to create a shipment. Here is an overview of the information that is required:
- Order type: Return
- Pickup details: These are the details we need to successfully collect the order from the recipient.
- Dropoff details: This information may come from Salesforce if it has been configured, or if you are using self-signup, there may be additional fields that need to be filled out.
- Parcel details: This includes information about what we will be collecting and delivering.
Some additional tips:
- Add a note with which items are specifically being returned
- Mark the Return Order as Ready for Collection
- In addition, for Fulfillment Clients you should provide the client’s with a packing slip to print for returns which includes the SKU names and counts so Quiqup can process them accordingly.
Please refer to Last Mile Returns Policy or Returns (Fulfilment) for a full process overview, and our policies
Bulk orders (multiple orders)
1. Click on the +Create Bulk Order button.

2. Click on Download CSV Template

3. Open the Template-Orders.csv in Excel or any other spreadsheet software.

Fill in the template as following:
- Order number - here you can either type in your order ID or any random number
- Customer name - the name of your customer in any format
- Mobile - your customer's phone number.
- *Only 9 digits, no spaces or special characters
- Address - your customer's address. Please, make it as accurate as possible
- City - your customer's city
- Area - area of the customer's address. To find out the respective area, please refer to Google Maps
- COD - If your order is prepaid put 0. If it is COD,specify the total amount that a courier will have to collect from your customer (order amount + delivery charge).
- Delivery Instructions - this field is only visible to the courier and is there to provide information like "Leave at the reception". If you do not have any instructions - leave it blank.
- Service Type- please fill in the field with one of the following service types (please, use the exact same naming as written below):
- 4 Hours
- Same Day
- Next Day
4. Save the document as a CSV file.

5. Uploading the CSV file.
Upload your CSV file by dragging and dropping it to the Bulk Upload Page.

6. Downloading the label.
After successfully uploading the CSV file, press Download Labels. Print the labels and attach them to your orders.

Orders with multiple boxes
What if you have several boxes in one order.
1. On the home page, go to “actions” on the right and click on the eye (view order details).

2. Once you’re on the page, click on “edit” near shipment number

3. Then click on “Add new parcel”. Add as many parcels as you have in your order.

Edit the order
Orders are editable only in the Pending & Ready for Collection state. Orders in any other state are immutable.
Order details can be edited by clicking on the order in Quiqdash, going to Action → Edit

If you edit an order in Ready for Collection status a duplicate order will be created and the current one will be cancelled.

Prepare the order
1. Go back to live orders and you will see the order as “pending.”
2. Downloading the label
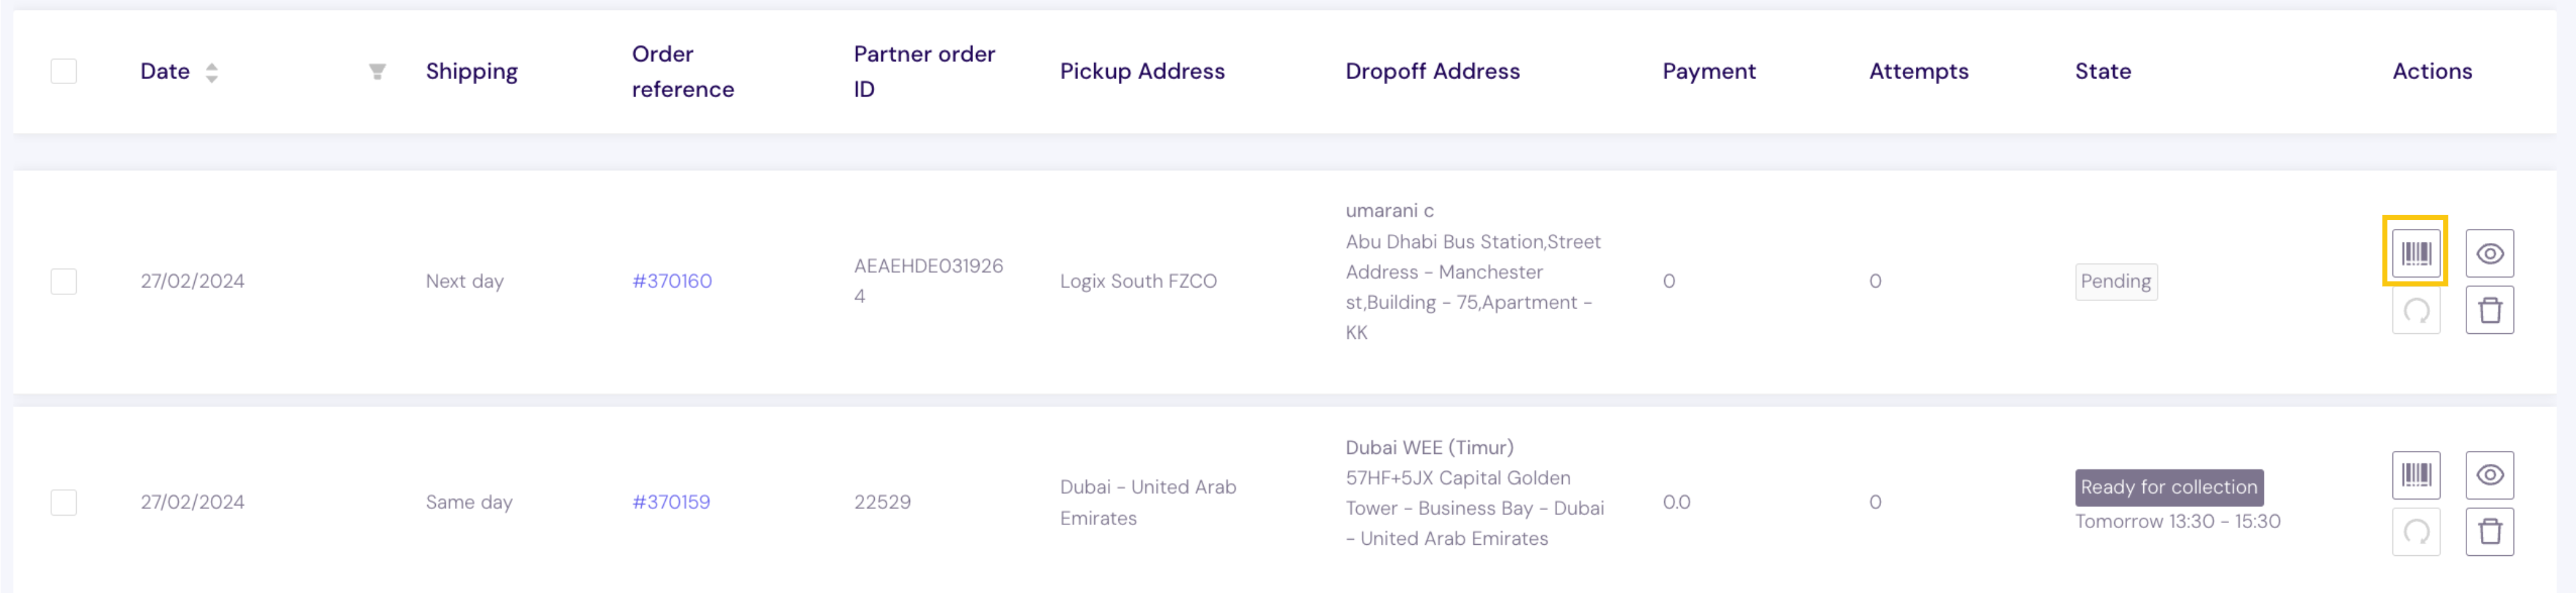
On the homepage to your right press Download label. Print the label and attach it to your order.
For guidelines on packaging please refer to 'link'
3. Making order ready for collection

When the order is ready to be shipped and the label is attached, select the order by checking the box to your left and press Ready for collection at the top right corner.
You can also do this in bulk by selecting multiple orders.

Was this article helpful?
That’s Great!
Thank you for your feedback
Sorry! We couldn't be helpful
Thank you for your feedback
Feedback sent
We appreciate your effort and will try to fix the article